
Customization
- Getting Started with Customization
- Examples
- Export Options
- Adjusting Filenames
- Procedures
- Constraints
- Editing Procedures and Constraints
- Running Batcher Without Dialog
Getting Started with Customization
Beyond the basic features, Batcher allows you to:
- adjust image/layer names,
- apply custom procedures to each image/layer (scale down, insert background, layer effects, GIMP plug-ins, …),
- filter image/layers by applying constraints (only filenames matching a suffix, only visible layers, …).
As the amount of customization may be overwhelming at first, you may want to take a look at a few examples below.
Examples
I don’t want to preserve folder hierarchy when exporting.
Add and check the Remove folder structure procedure if not already (Add Procedure... → Remove folder structure).
How do I rename the images to form a sequence of numbers, e.g. “image001”, “image002”, …?
Click on the text entry next to Name and choose image001, or type image[001] in the entry.
I want to adjust brightness in the images. Can this be done?
Yes! You may apply any GIMP filter or plug-in:
- Select
Add Procedure... → Add Custom Procedure... - Find
gimp-drawable-brightness-contrastin the procedure browser. - Adjust the options as desired.
- Select
Addto add the procedure.
How can I insert watermarks?
You can think of watermarks as foreground, i.e. a layer added on top of your images.
For Batch Convert:
- Add the
Insert foregroundprocedure and specify an image file serving as the foreground. - (optional) You can adjust how the foreground is merged by setting the merge type in the
Merge foregroundprocedure that was added automatically.
For Export Layers and Edit Layers:
- In GIMP, assign a color tag to the layer(s) you want to consider foreground (right-click on a layer →
Color Tags→ choose your color). - Add the
Insert foregroundprocedure and adjust the color tag as necessary. - (optional) If you want the foreground to be offset to the current layer rather than the image canvas, place this procedure after
Resize to layer sizeby dragging it ontoResize to layer size. - (optional) You can adjust how the foreground is merged by setting the merge type in the
Merge foregroundprocedure that was added automatically.
I need every image to have the same background.
You can follow the same steps as in the example above, except that you add the Insert background procedure (and adjust Merge background as needed).
I want to create a single multipage PDF file.
While multipage PDF export is already possible in GIMP without any third-party plug-ins, Batcher allows you to apply custom procedures before the export or export each folder/group layer as separate PDFs.
- Select or type
pdfas the file extension. - Press the
Options...button and select an option inPerform export:. To export a single image, selectAs a single image. - If you selected
As a single image, adjustImage filename patternas seen fit. - For Export Layers, you may want to uncheck the
Resize to layer sizeprocedure to use the image size (since PDF pages have the same dimensions), otherwise you might obtain unexpected results.
I want to be able to export to multiple file formats at once.
You can achieve this by adding the Also export as... (or Export) procedure.
Each time you add this procedure, adjust the file extension, file format options and other settings as needed.
I want to export all layers using the image size, not the layer size.
Uncheck or remove the Resize to layer size procedure.
I want to export only visible layers.
Check the Visible constraint (or add one if not already via Add Constraint... → Visible).
I want to export only visible layers. However, I also want to exclude those that have invisible parent group layers.
- Check the
Visibleconstraint (or add one if not already). - Edit the
Visibleconstraint (press the icon to the right of the constraint name). In the dialog, click onMore optionsand then checkAlso apply to parent folders.
My layers contain a ‘.’. All characters after the ‘.’ are replaced with the file extension. How do I prevent this?
In the text entry next to Name, choose Full layer name or type [layer name, %e].
This ensures that the resulting image name will be e.g. some.layer.png instead of some.png (the default behavior).
How do I export only group layers at the top level?
- Uncheck the
Layersconstraint. - Add the
Group layersconstraint. - Add the
Top-levelconstraint.
Export Options
- How to adjust file format options: If set to
Interactively, a native file format dialog is displayed for the first image to be exported. If set toUse options below(the default), you can adjust file format options in place without showing a file format dialog. - File format options: A list of options specific to the file format typed in the main dialog.
- If a file exists: If set to
Ask(the default), the user is asked to choose how to handle existing files (replace, skip, rename, etc.). Setting this to a different value applies that mode to each file without asking the user (e.g. setting this toReplacewill automatically replace all existing files with the same name). - Perform export: Whether to export each item separately (“For each image”/”For each layer”), each top-level item or folder separately (“For each top-level image or folder”/”For each top-level layer or group”), or a single image containing all items (“As a single image”). The latter two options provide multi-layer export. This allows exporting e.g. multipage PDFs or animated GIFs with additional custom procedures applied before the export.
- Image filename pattern: Filename pattern available when a single image is exported (the “Entire image at once” option is selected).
The text entry next to
Namestill applies to individual layer names (since some multi-layer file formats also store layer names, e.g. TIFF or PSD). - Use original file extension/Use file extension in layer name: If an image/layer name has a recognized file extension, use that file extension in place of the default file extension. Note that, currently, the only way to adjust file format options for each different file format is to set How to adjust file format options to
Interactively. - Convert file extension to lowercase: File extensions in layer names are converted to lowercase.
- Use original modification date (Batch Convert only): Preserves the original access and modification dates.
Adjusting Filenames
There are several built-in fields that you can combine to form a name pattern.
For example, image[001] renames the images/layers to image001, image002 and so on.
The fields are described below in detail.
Press the Down button or click anywhere on the entry to display the list of available fields.
The text entry can show you examples of how each field is used if you place the text cursor inside a field (e.g. inside [001]).
The input list of images/layers automatically updates as you change the name pattern and so can greatly help you figure out how your specified pattern affects the image/layer names.
You can combine multiple fields if needed, for example [layer name]-[001].
Fields must be enclosed in square brackets and must have a correct number of options. Options must be separated by commas. Invalid options result in the field being inserted literally.
Available fields
You can choose the fields from the dropdown list displayed when clicking on the text entry, or you can type the fields manually.
Number
A number incrementing for each image/layer. The numbering is separate for each folder/group layer.
Options:
%n: Continue numbering across folders/group layers.%d<number>: Use descending numbers, optionally with the specified padding (number of digits). If the number is 0, the first number is the number of images/layers to export within a folder/group layer, or, if%nis also specified, the number of all images/layers to export.
Examples:
[1]→1,2, …[001]→001,002, …,009,010, …,999,1000, …[005]→005,006, …[001, %n]→001,002, … (continues numbering across folders/group layers)[000, %d]→010,009, … (if the number of layers is 10)[10, %d2]→10,09, …
[image name]
The current image name.
Options:
- file extension strip mode:
%e: Never strip the extension.%i(Batch Convert only): Strip the extension only if the image has a file extension that does not match the entered file extension.%n(Batch Convert only): Strip the extension only if the image has a file extension that matches the entered file extension (the inverse of%i).
Examples:
[image name]for an image namedFrame→Frame[layer name]for an image namedFrame.png→Frame[image name, %e]for an image namedFrame.pngif the file extension ispng→Frame.png[image name, %i]for an image namedFrame.pngif the file extension ispng→Frame.png[image name, %n]for an image namedFrame.pngif the file extension ispng→Frame[image name, %e]for an image namedFrame.pngif the file extension isjpg→Frame.jpg[image name, %i]for an image namedFrame.pngif the file extension isjpg→Frame[image name, %n]for an image namedFrame.pngif the file extension isjpg→Frame.jpg
[image path] (Batch Convert only)
The “full path” of an image, from its topmost folder added as input to the image itself. This does not include folders above the folder added as input.
For example, if the folder named Body contains a subfolder named Hands which contains an image named Left, the image path will be Body-Hands-Left.
Options:
- separator: A string separating the path components.
Defaults to
-. - wrapper: A string that wraps around each path component.
The wrapper must contain
%cdenoting the path component. Defaults to%c. - file extension strip mode: See the
\[image name\]field.
Examples:
[image path]→Body-Hands-Left[image path, _]→Body_Hands_Left[image path, _, (%c)]→(Body)_(Hands)_(Left)[image path, _, (%c), %e]→Body-Hands-Left.png(if the image name isLeft.pngand the file extension ispng)
[layer name] (Export Layers and Edit Layers only)
The layer name.
Options:
- file extension strip mode:
%e: Never strip the extension.%i(does not apply to Edit Layers): Strip the extension only if the layer has a file extension that does not match the entered file extension.%n(does not apply to Edit Layers): Strip the extension only if the layer has a file extension that matches the entered file extension (the inverse of%i).
Examples:
[layer name]for a layer namedFrame→Frame[layer name]for a layer namedFrame.png→Frame[layer name, %e]for a layer namedFrame.pngif the file extension ispng→Frame.png[layer name, %i]for a layer namedFrame.pngif the file extension ispng→Frame.png[layer name, %n]for a layer namedFrame.pngif the file extension ispng→Frame[layer name, %e]for a layer namedFrame.pngif the file extension isjpg→Frame.jpg[layer name, %i]for a layer namedFrame.pngif the file extension isjpg→Frame[layer name, %n]for a layer namedFrame.pngif the file extension isjpg→Frame.jpg
Full layer name (Export Layers and Edit Layers only)
Equivalent to [layer name, %e].
[layer path]
The “full path” of a layer.
For example, if the image has a group layer named Body containing a group layer named Hands containing a layer named Left, the layer path will be Body-Hands-Left.
Options:
- separator: A string separating the path components.
Defaults to
-. - wrapper: A string that wraps around each path component.
The wrapper must contain
%cdenoting the path component. Defaults to%c. - file extension strip mode: See the
\[layer name\]field.
Examples:
[layer path]→Body-Hands-Left[layer path, _]→Body_Hands_Left[layer path, _, (%c)]→(Body)_(Hands)_(Left)[layer path, _, (%c), %e]→Body-Hands-Left.png(if the layer name isLeft.pngand the file extension ispng)
[output folder]
The output folder selected in the plug-in dialog.
Options:
- path component strip mode (defaults to
%b):%b<number>: Keep only<number>path components from the end.%bis transformed to the last path component, i.e. the folder name.%f<number>: Keep only<number>path components from the start.- any other value, such as
%, will resolve to the full path.
- separator: A string separating the path components.
Defaults to
-. - wrapper: A string that wraps around each path component.
The wrapper must contain
%cdenoting the path component. Defaults to%c.
Examples for a folder with the path C:\Users\username\Pictures:
[output folder]→Pictures[output folder, %]→C-Users-username-Pictures[output folder, %b2]→username-Pictures[output folder, %b2, _]→username_Pictures[output folder, %b2, _, (%c)]→(username)_(Pictures)[output folder, %f2]→C-Users
[replace]
Replaces a part of the specified field with another string. This essentially allows to fine-tune any field. Regular expressions are supported as well.
Options:
- field name: Any recognized field described in this section, except “Number”.
The field can be specified with options; if so, enclose the field in square brackets (
[and]). - pattern: Part of the field to replace.
The pattern can also be a regular expression using the same syntax as defined for the
remodule for Python. - replacement: Contents that should replace pattern.
The replacement can also be a regular expression using the same syntax as defined for the
remodule for Python. - (optional) count: Number of replacements to perform if the pattern matches multiple parts. If 0, perform replacements for all parts.
- (optional) flags: Flags further adjusting how the replacement should be performed.
Flags are specified in the
remodule for Python. Use the name without there.prefix. For example, to ignore case, typeIGNORECASEorignorecase. You can specify multiple flags separated by commas.
For the example below, suppose that an image is named Animal copy #1.
While the square brackets ([ and ]) enclosing the first three field options are optional, they are necessary in case you need to specify an empty string ([]), leading spaces or commas.
Examples:
[replace, [image name], [a], [b] ]→Animbl copy #1[replace, [image name], [a], [b], 1, ignorecase]→bnimal copy #1[replace, [image name], [ copy(?: #[[0-9]]+)*$], [] ]→Animal
[tags] (Export Layers and Edit Layers only)
Color tag assigned to a layer.
For example, suppose that a layer has a green color tag assigned.
Then (by default) the tag will be formatted as green.
Options:
- wrapper: A string that wraps around each tag.
The wrapper must contain
%tdenoting the tag. - color name, custom name, …: Color name in English followed by a custom name for the color. This allows you to map the color name to something else, e.g.
greentobackground. You can specify multiple such pairs in case your image contains layers with different color tags.
Examples:
[tags]→green[tags, %t, green, background]→background[tags, (%t), green, background]→(background)[tags, %t, blue, foreground]→ ``[tags, %t, green, background, blue, foreground]→background
[current date]
The current date.
Options:
- format: Date format as per the Python
strftimefunction. Defaults to%Y-%m-%d(year-month-day).
Examples:
[current date]→2019-01-28[current date, %m.%d.%Y_%H-%M]→28.01.2019_19-04
[attributes]
Attributes of the current image and the current Layer.
Options:
- pattern: A string formatting the attributes.
Available attributes:
%iw: The image width.%ih: The image height.%lw: The layer width.%lh: The layer height.%lx: The layer x-offset.%ly: The layer y-offset.
- measure: The measure in which the attribute values are displayed.
Applies to
%lw,%lh,%lxand%lyonly. Available measures:%px(default): Display absolute values in pixels.%pc: Display percentages relative to the image. A number may be included after%pcto specify the number of digits to round to (2 by default). For example,%pc1displays percentages rounded to a single decimal digit.
Examples:
[attributes, %lw-%lh-%lx-%ly]→1000-270-0-40[attributes, %lw-%lh-%lx-%ly, %pc]→1.0-0.54-0.0-0.08[attributes, %lw-%lh-%lx-%ly, %pc1]→1.0-0.5-0.0-0.1[attributes, %iw-%ih]→1000-500
Inserting reserved characters in options
To insert a literal space or comma in a field option, enclose the option with square brackets.
To insert a literal square bracket ([ or ]), double the bracket and enclose the option with square brackets (e.g. [[[] to insert a literal [).
If the last option is enclosed in square brackets, leave a single space between the last and the second to last closing square bracket.
Examples:
[image path, [ ] ]→Body Hands Left[image path, [,], [[[%c]]] ]→[Body],[Hands],[Left]
Procedures
Procedures allow you to apply image filters to each image/layer.
Press the Add Procedure... button and select one of the available procedures, or add a custom procedure.
For each procedure, you may:
- enable/disable the procedure,
- move the procedure up/down by dragging the procedure with mouse or by pressing Alt + Up/Down on your keyboard,
- edit the procedure,
- remove the procedure.
You can add the same procedure multiple times.
Built-in Procedures
Align and offset
Aligns layer(s) with the current image or, if specified, another layer within the image. You may specify additional offsets after the alignment is applied.
Options:
- Layers to align: Layers to align. This can be a single layer (e.g. the current layer, background, foreground) or all layers inserted in the currently processed image.
- Object to align layers with: Whether to align with the entire image or another layer.
- Another layer to align layers with
- Horizontal alignment: Left, center or right alignment, or Keep the horizontal position intact.
- Vertical alignment: Top, center or bottom alignment, or Keep the vertical position intact.
- Additional X-offset: Moves the layers horizontally by the specified amount.
- Unit for the additional X-offset: Can be pixels or percentages of image/another layer width/height.
- Additional Y-offset: Moves the layers vertically by the specified amount.
- Unit for the additional Y-offset: Can be pixels or percentages of image/another layer width/height.
Export/Also export as…
Exports an image/layer to the specified file format.
For Batch Convert and Export Layers, this performs export to another file format.
You can add this procedure multiple times to export to multiple file formats at once.
Options:
- Output folder: Folder to export the output image(s) to.
- File extension: File extension of the output image(s).
- All options specified in Export Options.
The name of the Export procedure is automatically updated as you modify the file extension.
For Batch Convert and Export Layers, when this procedure is added, the values of the options are copied from the default export options. For example, the output folder will be identical to the one currently selected in the main dialog. This simplifies setting up export to multiple file formats without the hassle of manually adjusting the export options in all added procedures.
When exporting each image separately (the default, which can be changed via the Perform export option), the Export procedure usually makes sense to be applied as the last procedure since procedures after Export would have no effect on the current layer being processed.
Apply opacity from group layers (Export Layers and Edit Layers only)
Combines opacity from all parent group layers for each layer. This corresponds to how the layer is actually displayed in GIMP.
For example, if a layer has 50% opacity and its parent group also has 50% opacity, the resulting opacity of the layer will be 25%.
Insert background
Inserts a new layer behind the current layer.
For Batch Convert, specify an image file to be loaded as background.
For Export Layers and Edit Layers, mark layers in your opened image with a color tag.
The blue color tag is used for background by default.
You may set a different color tag by adjusting the Color tag option.
This procedure is inserted at the first position.
This prevents potential confusion when Resize to layer size is not present and the background is offset relative to the layer rather than the image canvas.
If this is your intention, you can always move this procedure below Resize to layer size.
The background is merged automatically at the end of processing as the Merge background procedure is automatically added. See Merge background below for more information.
For Export Layers and Edit Layers, the background layers are excluded from processing by default as the Not background constraint is automatically added and enabled.
Insert foreground
Inserts a new layer in front of the current layer.
For Export Layers and Edit Layers, the green color tag is used as foreground by default.
The Merge foreground procedure is added automatically. For Export Layers and Edit Layers, the Not foreground constraint is added automatically.
For more information, see Insert background above.
Merge background (only available if Insert background is added)
Merges already inserted background (via Insert background, see above) into the current layer.
When exporting, the background is merged automatically. However, if needed, you can reorder this procedure to perform the merge earlier and then apply procedures on the current layer, now merged with the background.
For Edit Layers, this procedure ensures that you have a single merged layer rather than having the background as a separate layer. If this is not what you desire, you may uncheck this procedure.
If there is no background layer inserted, this procedure has no effect.
Options:
- Merge type: Indicates how to perform the merge. The available merge types are the same as for Merge Visible Layers, under the section
Final, Merged Layer should be:.
Merge foreground (only available if Insert foreground is added)
Merges already inserted foreground (via Insert foreground, see above) with the current layer.
For more information, see Merge background above.
Merge filters
Merges all visible filters (layer effects) in the specified layer.
Merge visible layers (Batch Convert only)
Merges all visible layers within the image into a single layer. Invisible layers are removed.
This is useful if the image contains multiple layers and you want to apply filters (layer effects) or other procedures on the entire image.
Remove folder structure
Exports all images to the output folder on the same level, i.e. subfolders are not created.
Options:
- (Edit Layers only) Consider visibility of parent folders: If checked, a layer will become invisible if any of its parents are not visible (even if the layer itself is visible). Having this checked corresponds to how the layers are displayed in the image canvas.
Rename
Renames images/layers according to the specified pattern.
This procedure uses the same text entry as the one in Batch Convert or Export Layers next to Name, described in Adjusting Layer Names (Filenames).
For Batch Convert and Export Layers, this procedure performs renaming on top of the entry next to Name.
Additionally, this procedure allows customizing whether to rename both images/layers and folders (by checking Rename folders/Rename group layers) or rename folders only (by checking Rename folders/Rename group layers and unchecking Rename images/Rename layers).
Scale
Scales the entire image or a layer, using absolute (pixels) or relative (percentages) measures.
Options:
- Image: Image to scale and/or to use for computing the new width or height.
- Layer: Layer to scale and/or to use for computing the new width or height.
- Object to scale: Whether to scale the entire Image or the Layer within the image.
- New width: The new width.
- Unit for width: Unit for the new width - pixels or percentages of image/layer width/height.
- New height: The new height.
- Unit for height: Unit for the new height - pixels or percentages of image/layer width/height.
- Interpolation: Type of interpolation to use.
- Use local origin: If checked and Object to scale is set to Layer, the layer will be scaled around its center. If not checked, the layer will be placed to the upper left corner of the image.
- Scale to fit: If checked, the image/layer will be scaled such that it fits New width or New height, whichever is smaller, while also preserving the aspect ratio. You can imagine a canvas having the dimensions New width and New height to which the image/layer will be fit.
- Keep aspect ratio: If checked, the image/layer is scaled such that the ratio between the width and height is preserved. You can choose the dimension to be fixed via the Dimension to keep option.
- Dimension to keep: The dimension - width or height - to be considered fixed when scaling with the Keep aspect ratio option checked.
Resize to layer size (Batch Convert and Export Layers only)
If enabled, the image canvas will be resized to fit the layers. For Export Layers, this means that the exported image will have the same dimensions as the layer to export.
This procedure is enabled by default for Export Layers.
To keep the image canvas intact (thus keeping the layer position within the image), uncheck this procedure. Note that in that case the layers will be cut off if they are partially outside the image canvas.
Adding Custom Procedures
You can add any GIMP plug-in, layer effect (filter, GEGL operation) or GIMP procedure by pressing Add Procedure... and then selecting Add Custom Procedure.... Both built-in and any third-party plug-ins and layer effects are supported.
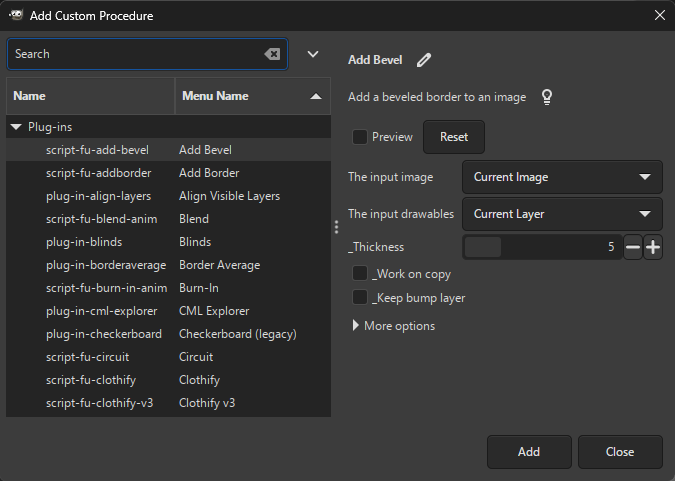
You can preview how the selected procedure affects the resulting image (by pressing Preview) and adjust procedure options.
Once you are settled on the procedure, press Add to permanently add it to the list of procedures.
You can edit the procedure anytime after adding it.
All layer effects (procedures under the Filters, Effects category) have the following common parameters:
- Blend mode - blend mode for the effect (default, dodge, burn, hard light, …).
- Opacity - the opacity of the effect.
- Merge filter - the effect will be applied destructively, i.e. will be merged into the layer.
- Visible (displayed under
More options) - if unchecked, the effect will be added, but will not be applied. - Filter name (displayed under
More options) - a custom name for the effect. If empty, a default name is assigned by GIMP.
Constraints
To exclude certain images/layers from processing and export, press the Add Constraint... button and select one of the available constraints.
Just like procedures, you may enable/disable, reorder, edit or remove constraints.
Built-in Constraints
Layers (Export Layers and Edit Layers only)
Processes only layers (i.e. group layers are not processed).
Group layers (Export Layers and Edit Layers only)
Processes only group layers.
You need to disable the Layers constraint since having both enabled will result in no layer being processed.
Not background (Export Layers and Edit Layers only, and only available if Insert background is added)
Processes only layers that are not inserted as background via Insert background.
Not foreground (Export Layers and Edit Layers only, and only available if Insert foreground is added)
Processes only layers that are not inserted as foreground via Insert foreground.
Matching file extension
Processes only images/layers having the file extension typed in the main dialog.
Matching text…
Processes only images/layers matching the specified text.
You can adjust how to perform matching - whether the image/layer name should start with, contain or end with the specified text to match. For example, with the “Ends with text” option, you can match against an arbitrary file extension instead of the one typed in the main dialog (via the Matching file extension constraint).
Matching can be made case-insensitive by checking the Ignore case sensitivity option.
You can also specify a regular expression pattern as defined in the re module for Python. Errors in the regular expression pattern will result in no matches.
Recognized file format (Batch Convert only)
Processes only images whose original file extension is supported by GIMP.
If you use third-party file load plug-ins with their own file extension, uncheck this constraint so they can be processed.
Selected in GIMP (Export Layers and Edit Layers only)
Processes only layers selected in GIMP.
Top-level
Processes only top-level images/layers (i.e. images/layers inside any folder/group layer are excluded).
Visible (Export Layers and Edit Layers only)
Processes only visible layers.
With color tags (Export Layers and Edit Layers only)
Processes only layers having a color tag.
By default, all layers without a color tag are excluded.
To process only layers with specific color tags, edit this constraint and add the color tags for the Color tags option.
For example, by adding a blue tag, only layers containing the blue tag will be processed.
Other tagged or untagged layers will be excluded.
Without color tags (Export Layers and Edit Layers only)
Processes only layers without a color tag.
By default, all layers with a color tag are excluded.
To exclude only specific color tags, edit this constraint and add the color tags for the Color tags option.
For example, by adding a blue tag, all layers except the ones containing the blue tag will be processed.
If a group layer has a color tag, it will normally not be excluded.
To also exclude group layers with color tags, click on More options and check Also apply to parent folders.
Editing Procedures and Constraints
To edit a procedure or a constraint, press the icon to the right of the procedure/constraint name and adjust the options in the displayed dialog.
The dialog will be automatically displayed for most built-in procedures when added.
If a procedure contains a layer/drawable/item option, you may select one of the following:
Current Layer(default): applies the procedure to the currently processed layer. For Batch Convert, an input image usually contains a single layer, which will be considered the current layer. In case of multi-layer images, the first layer is considered, or the first selected layer if the stored image file contains information on the selected layers (e.g. XCF or PSD).Background Layer: applies the procedure to the layer representing background, inserted via theInsert backgroundprocedure. If there is no such layer, the procedure will have no effect.Foreground Layer: applies the procedure to the layer representing foreground, inserted via theInsert foregroundprocedure. If there is no such layer, the procedure will have no effect.All Layers: applies the procedure to all layers within the currently processed image. This option is available usually only for procedures having theThe input drawablesargument. Note that a procedure may not work on multiple layers at once and thus may yield an error if this option is chosen.
If a procedure contains an image option, there is only one option available - Current Image, representing the currently processed image.
More Options
Expanding More options allows you to adjust the options below.
Enable for previews
If checked (the default), the procedure/constraint is applied in the preview. Unchecking this can be useful if a procedure takes too long.
Also apply to parent folders (constraints only)
If checked, an image/layer will satisfy a constraint if all of its parent folders/group layers also satisfy the constraint.
For example, if this option is checked for the Visible constraint, a visible layer is excluded if any of its parent group layers are not visible.
Running Batcher Without Dialog
It is also possible to run Batcher without an interactive dialog, e.g. for automation purposes.
The plug-in-batch-convert procedure allows running Batch Convert non-interactively, using the supplied UTF-8-encoded file (the inputs parameter) containing files and folders on each line, plus other export parameters such as the output folder or file extension. If run-mode is Gimp.RunMode.WITH_LAST_VALS, all these parameters (including inputs) will be ignored and instead the settings last used interactively (in the main dialog) will be considered.
The plug-in-batch-export-layers procedure exports layers with the specified or the last used settings, depending on the value of the run-mode parameter.
Likewise, plug-in-batch-edit-layers runs batch editing layers with the specified/last used settings.
You can also run plug-in-batch-convert, plug-in-batch-export-layers or plug-in-batch-edit-layers with settings imported from a file by specifying the settings-file parameter. In that case, the run-mode must be Gimp.RunMode.NONINTERACTIVE and all other procedure arguments will be ignored (since these arguments will be assigned values from the settings file). The exception is the inputs parameter for plug-in-batch-convert, which will always be considered and the saved input images in the settings file will be ignored.
The plug-in-batch-export-layers-quick and plug-in-batch-edit-layers-quick procedures perform layer export/editing with always the last used settings.
The plug-in-batch-export-selected-layers and plug-in-batch-edit-selecetged-layers procedures perform export/editing of selected layers with always the last used settings.